Enables one pc of choco vending out by hitting the red button.
5/18/2016
IchigoJam Choco Vendor with a card reader
Just verify the card insertion.
Enables one pc of choco vending out by hitting the red button.
Enables one pc of choco vending out by hitting the red button.
5/07/2016
IchigoJam Choco Vendor 2 チロルチョコベンダー続
IchigoJam Choco Vendor + Card Reader
Gave up to make a coin accepter then used a card reader instead.
Just sense the card insertion and it enables the button switch.
コインアクセプタをつくるのは、たいへんなので、カード挿入式にした。
といっても、挿入確認だけ。
カードを入れると、一回だけチロルチョコボタンが押せる。
・タミヤのギヤー は、最低速にしたので、トルクが強い。チロルが詰まると固まる。
モーターはOFFにしても惰性で動く。

5/03/2016
IchigoJam Choco Vendor チロルチョコベンダー
Made this
Proto 0.1Tested: Circular motion to liner sliding motion to push the choco out.
SW the Tamiya Motor by a tr with OUTPUT of IchigoJam.
Controlled by the IchigoJam(LPC1114) and BASIC programming
タミヤのギヤーボックスを使用。モーターをトランジスタで制御。
BASIC programming
Wait the start tact switch ONStart motor
Timer(TICK) reset for "timeout"
Wait the limit switch ON
Stop the motor after WAIT for the point
Monitor the HALT swith to avoid the overload bcause of jamming choco
Next project
Coin acceptor2/23/2016
IoT and Vacuum Technology
IoT + : Something
Think about something unique with IoT
Need something unique to create new idea/innovation.
IT can't be useful without things.
Not many hacker people image the vacuum technology as a seed of new idea
Talking about 10^-6 pa enclosure from 0.5"sq up to 5"x7" glass box
Sensing devices
Trial stage 1
Advantages? Benefits?
No air influence: Ultra high sensivity G sensor,
A micro mirror driven by electric field: the response of movement could be improved significantly.
The reliability also be improved due to less interference of gas inside ,
2/05/2016
Traffic Signal Programming Kit for Kids
Traffic Signal Light Programming Kit for Kids
Kid's computer "Ichigojam" BASIC Programming
Purpose
Open the first step for age 9-12 kids to learn programming.
Encourage kids to learn fundamental programming knowledge with lighting LEDs as a traffic light.
Use fundamental commands to control LEDs.
9yr old kids understood the following commands and program flow;
OUT
WAIT
GOTO
--------------------
Wiring
IchigoJam board and LEDs
OUT1 LED (Green) via a resister to set the current.
OUT2 LED (Yellow) via a resister to set the current.
OUT3 LED (Red) via resister to set the current.
Each resister should be adjusted to set the LED current.
Normally 5 to 10mAea.
Programming Commands
Some hints
Stage 1:
Kids understand how OUT commands work
10 OUT1,1 'Light Green ON
20 WAIT 600 'wait approx 10sec.
30 OUT1,0 'Light Green OFF
Stage 2 :
Kids understand how INPUT command works
Change the signal light duration / timing
Input the each LED time from keyboard
10 INPUT"GREEN",G
20 INPUT"YELLOW",Y
30 INPUT"RED",R
WAIT G*60
Stage 3
Kids can use to simpify the program flow
FOR NEXT
IF THEN ELSE
Reference
CU20027-Y1A Spec data (PDF)
UART interface, Just wire TX to SI
Send ASCII character code to indicate.
 |
| Display Module/CU20027-Y1A shows the light duration |
Traffic Signal Light fixture by 3D printer

2/04/2016
Interesting VFD Hacking Video EEVblog #717
Found an interesting Youtube Video.
It looks 1980's old type VFD moduled by Bubcock/US.And it 's driven by Arduino 30years after its production date!
He explains how it works.
EEVblog #717 - How To Hack Vacuum Fluorescent Displays
2/02/2016
Easy use :VFD Module 2 x 20 Character Display UART Interface
Got a VFD Module
CU20027-Y1A Easy way to use by UART
1. Use a VFD
The best possible readability needed for the application.
The reliability is another important factor considering factory use.
I used an ASCII VFD Module. It has 5x8 dot font and 2x20 character position.
Simple interface and command to control preferred
2. Easy to display text messages
I wanted the minium design time for hard and soft works I used minimum commands.
This module has so many functions but I need only a simple text indication.
I used only simple ASCII commands.
I tried not to use the code library and other support softwares.
1) Power supply
I used a 5V 0.5A power supply . 200-300mA current flow observed in operation.
Wiring : Two wires, 5V to VCC, 0V to GND(common)
2) Data
UART (Asynhronous Serial) 38.4Kbps (Default) or 19.2Kbps (Jumper 0 short)
I ignored "BUSY" signal to reduce the wires.
Wiring : Only two wires, SIN and GND(common) are used to nterface to the host.


3. How it looks
It's so bright. A plastic color filter is recommended to get a better contrast.
Green,Blue,Gray colors can be used. The photos are my favorite colors.
 |
| CU20027-Y1A VFD Module with a" Rose" acrylic panel |
 |
| UCU20027-Y1A VFD Module with a "Neutral" acrylic panel |
4. Programming
1) ASCII control code
Just send a Home Position "0Bh" at the initial setting.
It clears the screen and sets the cursor position in the left top.
I don't use the cursor indication so I sent "14h".

2) Character code and font
Straightforwardly,send ASCII text code to indicate the text you want.
3) Other commands
There are so many useful functions but maybe I use some unique commands;
"Font magnification" :1F 28 67 40 xy
Enlarge the font 2x or 4x .
"Individual Character Brightness Level Setting" : 1F 28 67 50 d1 d2 d3
Brightness of each chaaracter can be set by 8 levels.
References;
1/31/2016
Arduino Display w/GT20L16J1Y Japanese font ROM
GT20L16J1Y Japanese font ROM --- VFD
Copyright:vfd-fun http://vfd-fun.blogspot.jp/About
This trial is to display Japanese/Chinese characters on the VFD module with using Arduino and external font chip.
The interface of this font chip GT20L16J1Y is using SPI.
Font ROM Info
Schematic
Character scroll display /Sample Program for Arduino
Refer - Font chip at
http://trac.switch-science.com/wiki/KanjiROM
VFD Module Program: 16x16 dot font scroll display on VFD Module
for Arduino and GU280X16G-7xxx
kanjiROM_test_gu280x16.txt
Wiring: Arduino, Font Chip ,Display Module(GU280X16G)
 |
| Arduino+Jpn Font + GU-7000 VFD |
 |
| Font ROM to Display Bitmap Conv. |
1/15/2016
Retro VFD Clock with Lacquerware Stand
Single digit VFD Tubes 1970s' controlled by ATMEGA MCU.
This lacquerware(Japanese Urushi) Stand is 1920-1930 made.
Noritake VFD(Ise Electronics Corp. )"Itron" , This model, only a couple hundreds of tubes remain.
Next step would be fixing the design of PCB and lacquerware stand,making this retro 4digit clocks.
Unfortunately, this will be the very last 200 units batch available globally.

1/13/2016
Glass TouchKeypad and IchigoJam part2
A Glass Touch Keypad and IchigoJam Trial 2
IchigoJam と ガラス タッチキーパッド I2C接続
Continuous work after Dec10 2015 post
 |
| Key pads are formed with Aluminum fine pattern Lower resistance than ITO |
This time, the glass touch keypad worked.
Touch controller : Atmel AT42QT2120
 |
| Set up - put a printed sheet underneath the glass keypad. |

1. Wiring(5)
I2C connection to the IchigoJam
SDA--->IN3
SCL---->EX1
/Change---IN1 (Watch status change) normally "H"
I2C Address 0x1C (Fixed)
VCC--3.3V
GND--GND
2. Initialize of AT42QT2120(Atmel sensor driver chip)
Reset "/Change " L to H (Normally H but L at turn-on)
First thing to do;
Reset the chip! This was a bit tricky.
Reset the chip! This was a bit tricky.
Send reset command 0x07,0xFF(any nonzero value)
wait 500msec. (250msec Min?)
Dummy status read from the chip (I did this but not shown in the spec)
3. Read Keydata
Check any key detection status change "/Change"
Wait /Change H->L
or
Read sensor detection status (0x02)
Read data command 0x03
data D7,D6,----D0
Read data command 0x04
data x,x,x,x,D11,D10,D9,D8
Note;
I saw no key data even when "/Change" became L.
I just ignored null data.
4. Convert data to Key number
The order of leadout from the glass keypad is not
the same as sensor chip input/output numbering.
I had to convert the sensor data by the following
order.
Glass keypad 1,2, 3, 4, 5,6, 7,8,9,10,11,12
sensor data 1,0,11,10,2,4,7,9,3, 5, 6, 8
Multi-touch can be read.
5. Other settings
This Atmel chip can be set in various sensing mode.
For the pratical use it might be needed.
6. Trial kit
This kit is not being sold, but free samples are available both in the US and Japan(Tech Support)
I'll provide some samples for the educational /leaarning purposes.
I'll provide some samples for the educational /leaarning purposes.
7. Atmel AT42QT2120
Comm Mode : 1 to 12 keys, 1-9 wheel or slider
 |
| AT42QT2120 PCB for Glass touch keypad |
Standalone Mode:1 to 5 keys
 |
| Reference of pin numbers and Key number |
1/01/2016
I2C Test: TouchKey Display and IchigoJam
I2C Test :TouchKey Display Module and IchigoJam
IchigoJam とGU-D ModuleをI2Cで接続してみた
GU140X32F-D903S
140x32 dot matrix VFD with 8x2 Capacitive touch keypad
1. IchigoJam a BASIC computor for kids
What is the "IchigoJam";
LPC1114 based MCU board includes, Basic interpreter on chip, NTSC video output, PS2 Keyboard input,Digital/Analog I/O, UART,I2C..
Note:IchigoJam Basic uses "# "showing hex data "h"
2. I2C Connection to the IchigoJam
SDA: IN3
SCL: EXT
Connection: GU-D Module
SDA: PIN2
SCL: PIN5
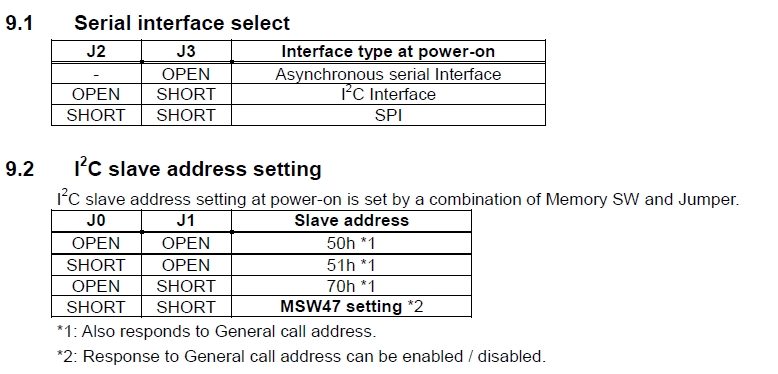
I2C Addr 50h (can be selected)
3. IchigoJam BASIC command
1) Write message data thru I2C
POKE #700,........ Store Module command
POKE #703,......... Store message data ASCII
An example for IchigoJam BASIC command for I2C write
An example for IchigoJam BASIC command for I2C write
I2CW(#50,#700,3,#703,7)
Send the data 3bytes from Addr 700h as a command and send 7bytes from 703h as message data.
2) Read Key data
POKE #710,#1f,#48,#10........ Store Module command to read data
I2CR(#50,#710,3,#720,4) :
Send the command (#10) for "All Touch SW Status Read" , 3bytes from 710h.
Save read 4bytes data to 720h---723h.
Send the command (#10) for "All Touch SW Status Read" , 3bytes from 710h.
Save read 4bytes data to 720h---723h.
3) Result
Read data form the module in #720,#721,#722,#723
#720 : Function Id (#10) (Just confirm the sent command data)
#721 : Data Length (2) (Tell how many bytes sent)
#722 : Keydata (SW16-9)
#723: Keydata (SW8-1)
4. Display functions of Module :GU140X32F-D903S
1) How to indicate your message on the module screen :Refer the spec for detail
Just send ASCII data or Bitmap to the module ,no need to use libraries to display simple text and bitmap.
Display control commands
Bitmap memory
international character fonts incl Asian fonts
Macro programming

Connection
 |
| GU140X32F-D903F |
Result: Data read from Module
 |
| IchigoJam Monitor with GU140X32F-D903S |
-Reference-
Display GU140X32F-D903S information


登録:
投稿 (Atom)